Building a Bulletproof Waitlist for My SaaS (Without Wrecking My Email Reputation)
If you're launching a SaaS product, a waitlist is more than a mailing list. It's a way to build hype, validate demand, and engage early adopters.
But building one isn't trivial. Poor email practices can tank your deliverability and reputation fast. That's where Amazon SES and tools like BlueFox Email come in.
In this post, I'll walk you through how I used Amazon SES, BlueFox Email and Github Pages to create a clean, automated waitlist system—no spam, no bots, just a streamlined setup that works. The best part? It's open source.
Introduction
If you're a developer working on a SaaS product, chances are you've considered adding a waitlist. It's a simple way to collect emails, but it can also do a lot more—like gauge early interest, build hype, and get feedback before you even launch. But setting one up properly is rarely as straightforward as it seems.
It's easy to slap a form on a page, but then what? You have to deal with email deliverability, build templates that don't break across providers, filter out spam submissions, and make sure you're not accidentally ruining your sender reputation. Email providers are quick to penalize anything that looks suspicious, and even a small mistake can land you in the spam folder.
Naturally, I looked into Amazon SES—it's reliable, powerful, and well-regarded for transactional email. But SES is also low-level by design. It won't help you build a frontend form, create templates, manage subscriptions, or validate signups. All of that is still on you. Trust me, you will be better off putting this much time on to your actual product.
While digging around for something that could fill in those gaps, I came across BlueFox Email. It is a up and coming tool which I had not used yet, but it claims to sit on top of SES while offering features like double opt-in, CAPTCHA protection, visual email editing, and subscriber list management. I haven't explored the full scope of what it does yet but it looked promising enough that I tried integrating it into a basic waitlist template.
That's what this post is about: how I approached building a waitlist, where the pain points were, and how BlueFox Email helped reduce some of the overhead. I've open-sourced the template so others can try it out too.
Why I Needed a Waitlist (And Why You Probably Do Too)
At this point in developing my SaaS product, I wasn't aiming for a massive user base. I just wanted to gauge initial interest. I needed to find out if there were people genuinely interested in my product and if they cared enough to sign up with their email. That's where a waitlist comes in handy. It's not just about gathering contacts; it's about confirming demand before the official launch.
So, I created a straightforward checklist:
- Verify if there's real interest
- Begin building a mailing list of interested developers
- Announce that something exciting is on the way
The plan was simple: set up a clean form, link it to a mailing system, and start monitoring the responses.
But, as you might expect, it's never just about the form.
If you've attempted this before, you know the drill: bots flood your list, incorrect addresses slip through, your domain gets flagged, and suddenly legitimate users aren't receiving your emails. You might rack up a few hundred signups, but if a large portion are fake or end up in spam, it completely undermines the effort.
While many tools might look good on paper, they often cater to marketers or require complicated workflows that add unnecessary layers. What I needed was something simple: a reliable "email in, confirmation out" process that just worked.
I was looking for a solution that would offer:
- Solid deliverability, ensuring my emails land in inboxes, not spam
- A streamlined experience that doesn't eat up my time
- A secure way to handle signups without worrying about bots and incorrect emails
That's when I turned to Amazon SES—a rock-solid choice for email delivery. But I quickly realized that while SES nails the infrastructure, it doesn't offer the tools needed to actually build a usable waitlist system. I needed more than just email delivery—I needed an entire flow that worked out of the box.
I Started with Amazon SES, Here's Why That Wasn't Enough
Like many developers who have worked with email systems, I initially chose Amazon SES. It's a robust, cost-effective solution that is widely recognized for sending transactional messages. If your goal is simply to send confirmation links or password resets, SES is more than sufficient.
However, when I attempted to create a comprehensive waitlist system with it, I encountered limitations.
SES provides the essential infrastructure for sending emails. It's like having the plumbing installed but not the fixtures. While it manages the sending process efficiently, everything else requires additional effort on your part.
Here are some of the challenges:
- No built-in forms
- No double opt-in functionality
- No list management features
- No bot filtering
- No email template design capabilities
This might be manageable if you have the time and resources to develop custom solutions around it. Unfortunately, I didn't have that luxury. I wanted to concentrate on building the core product rather than piecing together makeshift solutions.
While I appreciate SES for its strengths, it operates at a fundamental level. Attempting to expand its functionality into a complete email workflow often results in either excessive glue code or the need to integrate third-party tools.
That's when I began searching for a more comprehensive solution and discovered BlueFox Email.
Enter: BlueFox Email
Since SES isn't a one-stop solution, I began looking for something to address its shortcomings while still keeping SES in the mix. That's when I came across BlueFox Email.
Honestly, I hadn't heard of it before. It's an up and coming tool which I hadn't used yet, but the pitch really clicked with me. It's not about replacing SES; it's built to complement it seamlessly. BlueFox Email is clearly crafted for developers launching SaaS products, and it offers features that save you from writing tedious infrastructure code.
Here's what caught my attention:
- Tailored for SaaS teams and indie developers, avoiding the clutter of enterprise marketing tools.
- It integrates seamlessly with Amazon SES, handling email queues efficiently and offering smart management of bounces and complaints.
- Comes with double opt-in and CAPTCHA included, reducing fake signups and improving deliverability.
- Easy subscriber list management, no more dealing with CSV files and makeshift solutions.
- A user-friendly visual email editor that's actually usable, even for those of us who aren't design-oriented.
In summary, it provided just the right support to help me move quickly without losing control. I didn't have to reinvent the wheel or switch to a completely different platform. So, I decided to integrate it into my waitlist setup and see how it performs.
Okay, But What About Deployment?
Once I had everything running smoothly on my local setup with emails being sent reliably through SES and BlueFox Email, it was time to move on to deployment.
My goal was straightforward: Find a simple solution to get the waitlist live without the hassle of extensive infrastructure setup or provisioning. I wanted to avoid complexity and just needed a platform to host the static frontend.
That's when I thought about GitHub Pages.
Since my waitlist was a basic static site built with HTML and JavaScript, GitHub Pages was the ideal choice. All I needed to do was upload my project to a public GitHub repository, enable GitHub Pages in the settings, and within minutes, I had a live URL to share.
For those who haven't used GitHub Pages yet (though I bet most of you have), it's one of the simplest ways to deploy static projects. There are no servers to manage, no complicated configurations, and best of all—it's completely free. The setup is super easy, allowing you to focus on your product instead of stressing over deployment.
How To Quickly Set Up A Waitlist with BlueFox Email
If you're looking for a quick and straightforward way to set up a waitlist, BlueFox Email makes it super simple, especially when you combine it with Amazon SES and GitHub Pages. Here's how to get everything up and running in just a few easy steps:
-
Prepare Your Amazon SES
To send emails, you'll need Amazon SES. It's lightweight, budget-friendly, and perfect for developers.
- Obtain your SES credentials – You'll need these to send emails.
- Verify your email or domain – This step is necessary before you can start sending emails.
Need help? Check out the step-by-step guide from BlueFox Email.
-
Set Up Your BlueFox Email Account
Once SES is ready:
- Create your BlueFox Email account.
- Get the URL for your subscriber list – This is where entries for your waitlist will go.
- Input your SES credentials in the BlueFox Email project settings.
BlueFox Email takes care of all the email functionality for you, no need for a custom backend.
-
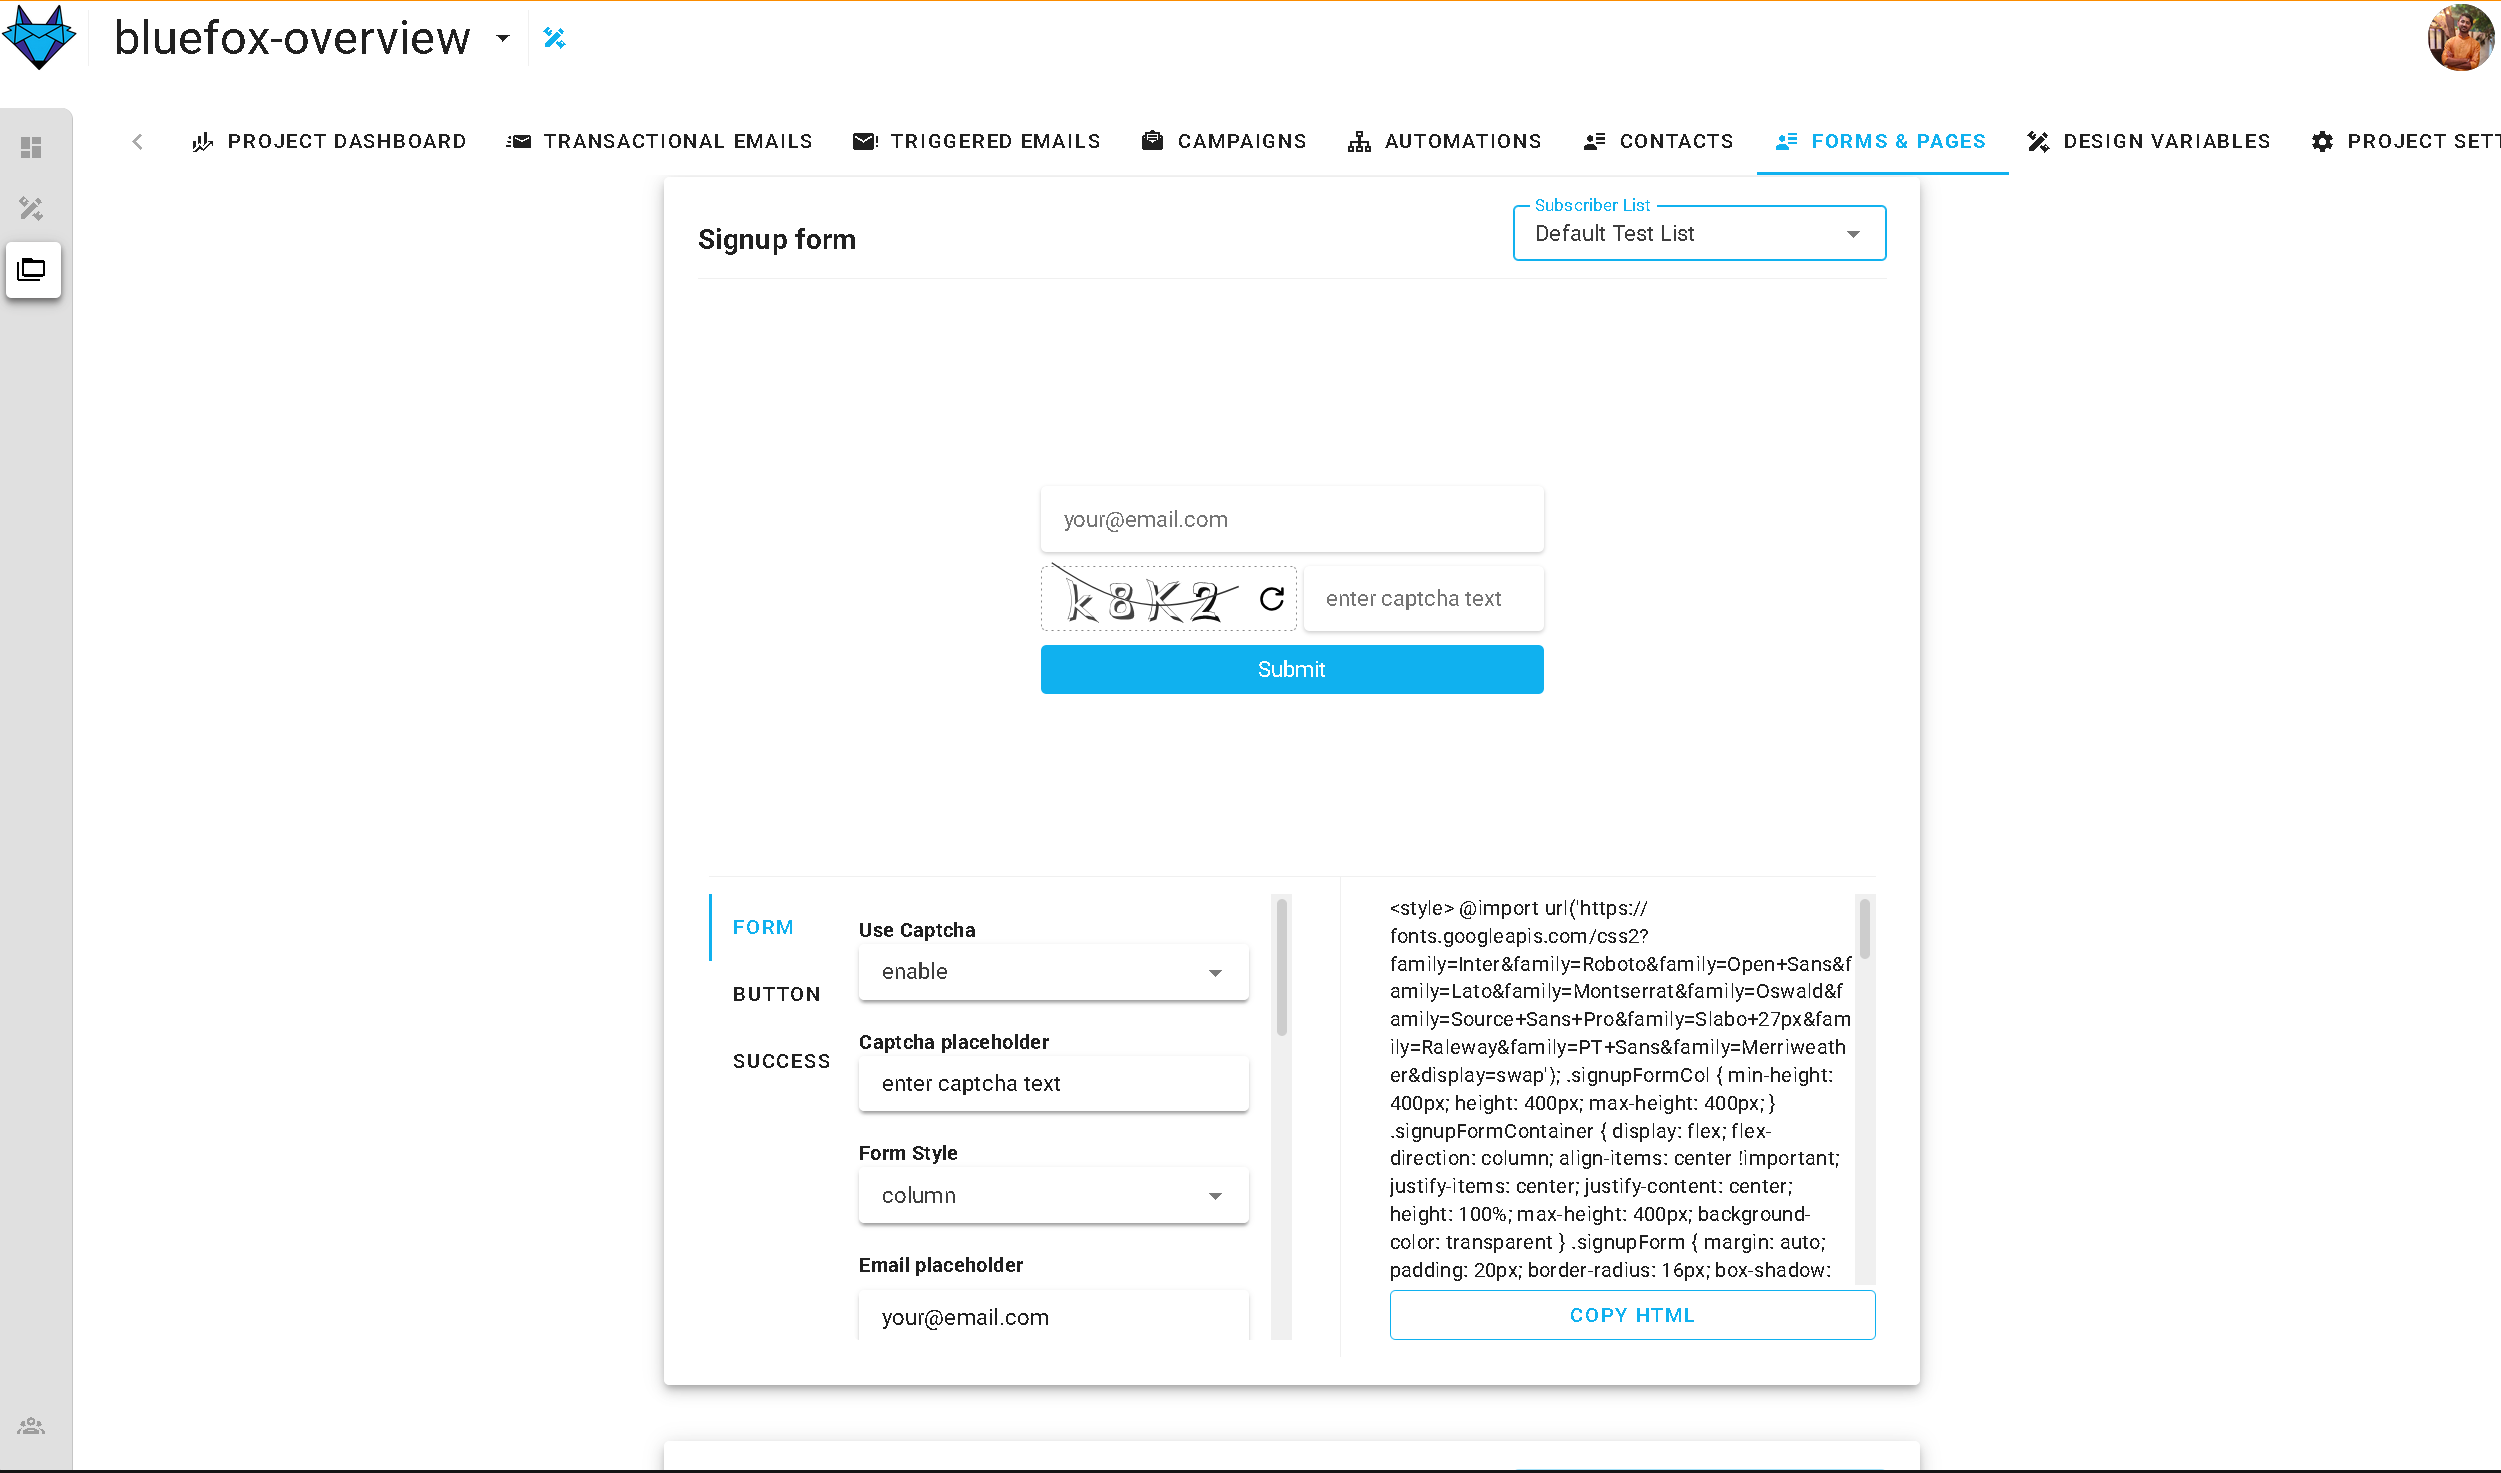
With the previous setup, you can navigate to the sign-up forms in your BlueFox Email project.
- Scroll down to the Sign-up forms.
- Select your subscriber-list from the drop down list at the top-right.
- Customize your sign-up form (add captcha, buttons, etc.)
- Finally, Copy HTML and paste it in your HTML file.
-
Host Your Waitlist Page on GitHub Pages
Create a simple frontend and:
- Push it to a GitHub repository.
- Enable GitHub Pages to host your page instantly.
Now you have a live waitlist with email notifications, powered by BlueFox Email and SES—no backend coding or server management required.
That's all there is to it! In less than an hour, you can launch a fully functional waitlist with automated emails and zero infrastructure hassle.
BUT! Aren't you a developer?
Absolutely, setting things up is straightforward, but let's face it, you likely need more than just a simple email field.
If you're looking to gather names, phone numbers, or any other custom information, that's where a little hands-on development comes into play. Now that we've got the backend sorted, let's dive into a straightforward custom implementation that you can start building right away.
For this guide, I'll be using Replit, it's quick for demonstrations and super easy for you to fork and tinker with.
-
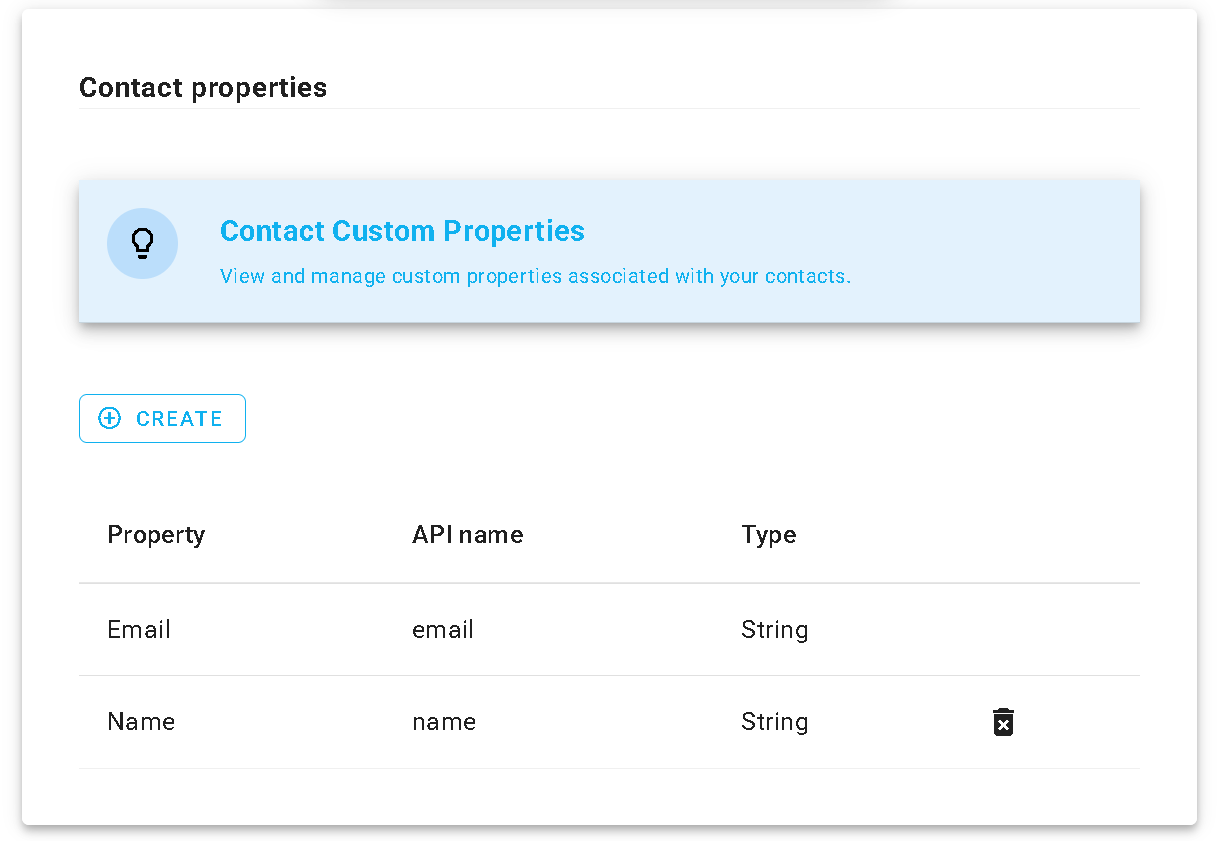
Set Contact Page Properties: Checkout docs for reference. Add all the properties you need—for this example I am going with email and name.
-
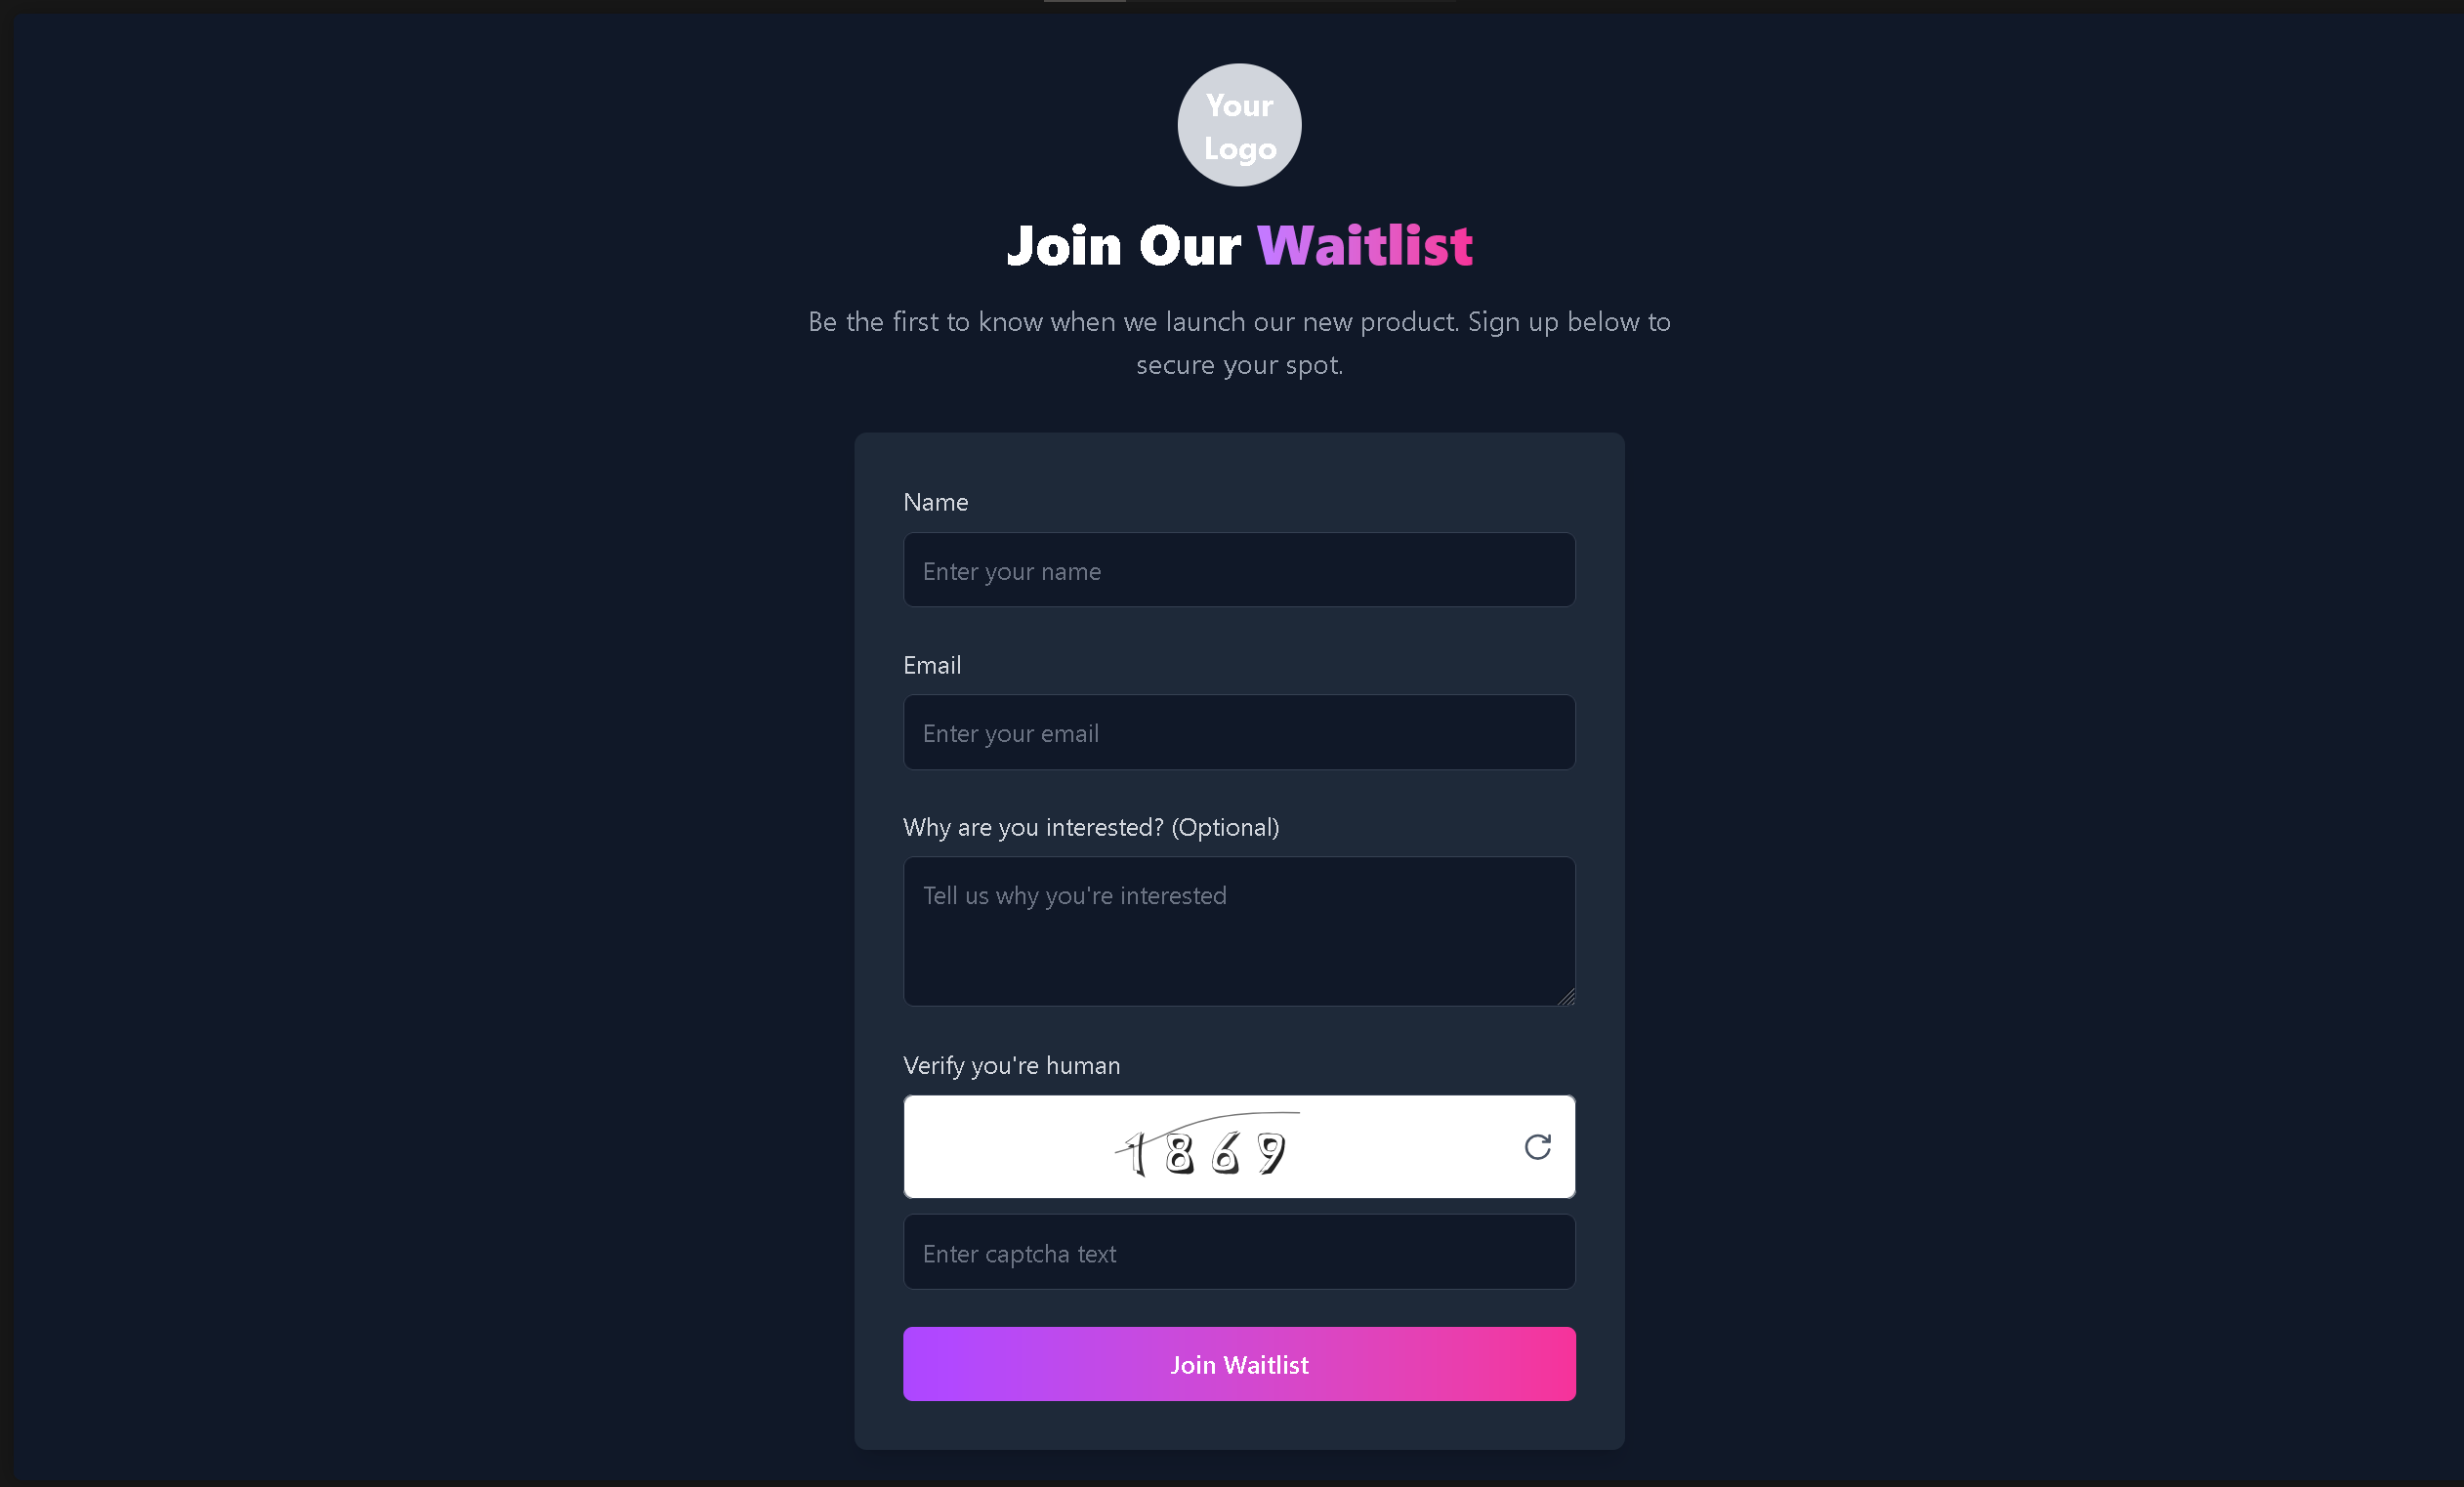
Create a frontend: You can go as crazy as you want to but for the purpose of this blog lets create a simple HTML form.
Note: Make sure the API name in Contact properties matches the
idandnameattribute of the form fields.<!DOCTYPE html> <html> <head> <meta charset="utf-8"> <meta name="viewport" content="width=device-width"> <title>replit</title> <link href="style.css" rel="stylesheet" type="text/css" /> </head> <body> <form id="waitlist-form"> <label for="email">Enter your email to join the waitlist:</label> <input type="email" id="email" name="email" required> <br> <label for="email">Enter your name to join the waitlist:</label> <input type="name" id="name" name="name" required><br> <button type="submit">Join Waitlist</button> </form> <script src="server.js"></script> </body> </html> -
Now for logic we will create a JS file.
document.getElementById('waitlist-form').addEventListener('submit', async function(event) {
  event.preventDefault();

  const email = document.getElementById('email').value;
  const name = document.getElementById('name').value;

  const url = 'https://api.bluefox.email/v1/subscriber-lists/YOUR_BLUEFOX_EMAIL_SUBSCRIBER_LIST_ID)';

  try {
    const response = await fetch(url, {
      method: 'POST',
      headers: {
        'Content-Type': 'application/json',
      },
      body: JSON.stringify({
        name: name,
        email: email
      })
    });

    if (response.ok) {
      alert('Thanks for joining the waitlist!');
      document.getElementById('waitlist-form').reset();
    } else {
      const errorData = await response.json();
      alert(`Error: ${errorData.message || 'Something went wrong.'}`);
    }
  } catch (error) {
    alert(`Network error: ${error.message}`);
  }
});
💡 IMPORTANT NOTE: Here, remember that if you are only doing static waitlist implementation (like in this blog), It is strongly recommended by BlueFox Email to not put API keys directly in frontend because of security reasons.
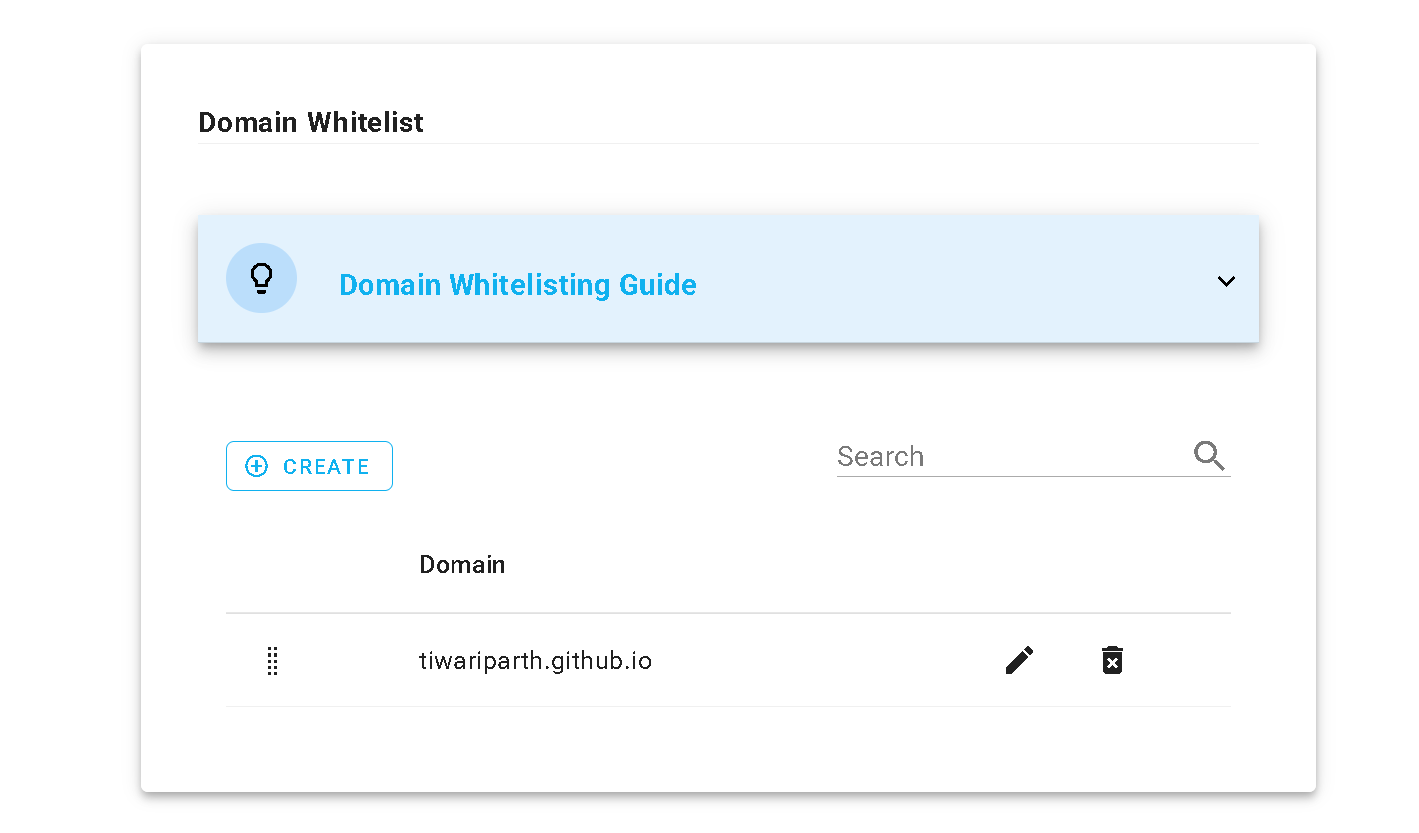
For this you can whitelist your domain by BlueFox Email itself—read about that more here. So for local development whitelisting your localhost with port (for example, localhost:3000) will also work, but eventually when we use github pages for deployment we will whitelist the domain name within BlueFox Email. Or if you are planning to use a custom domain name that should be whitelisted within BlueFox Email.
-
Finalize Build: Here is the final look at the local development.
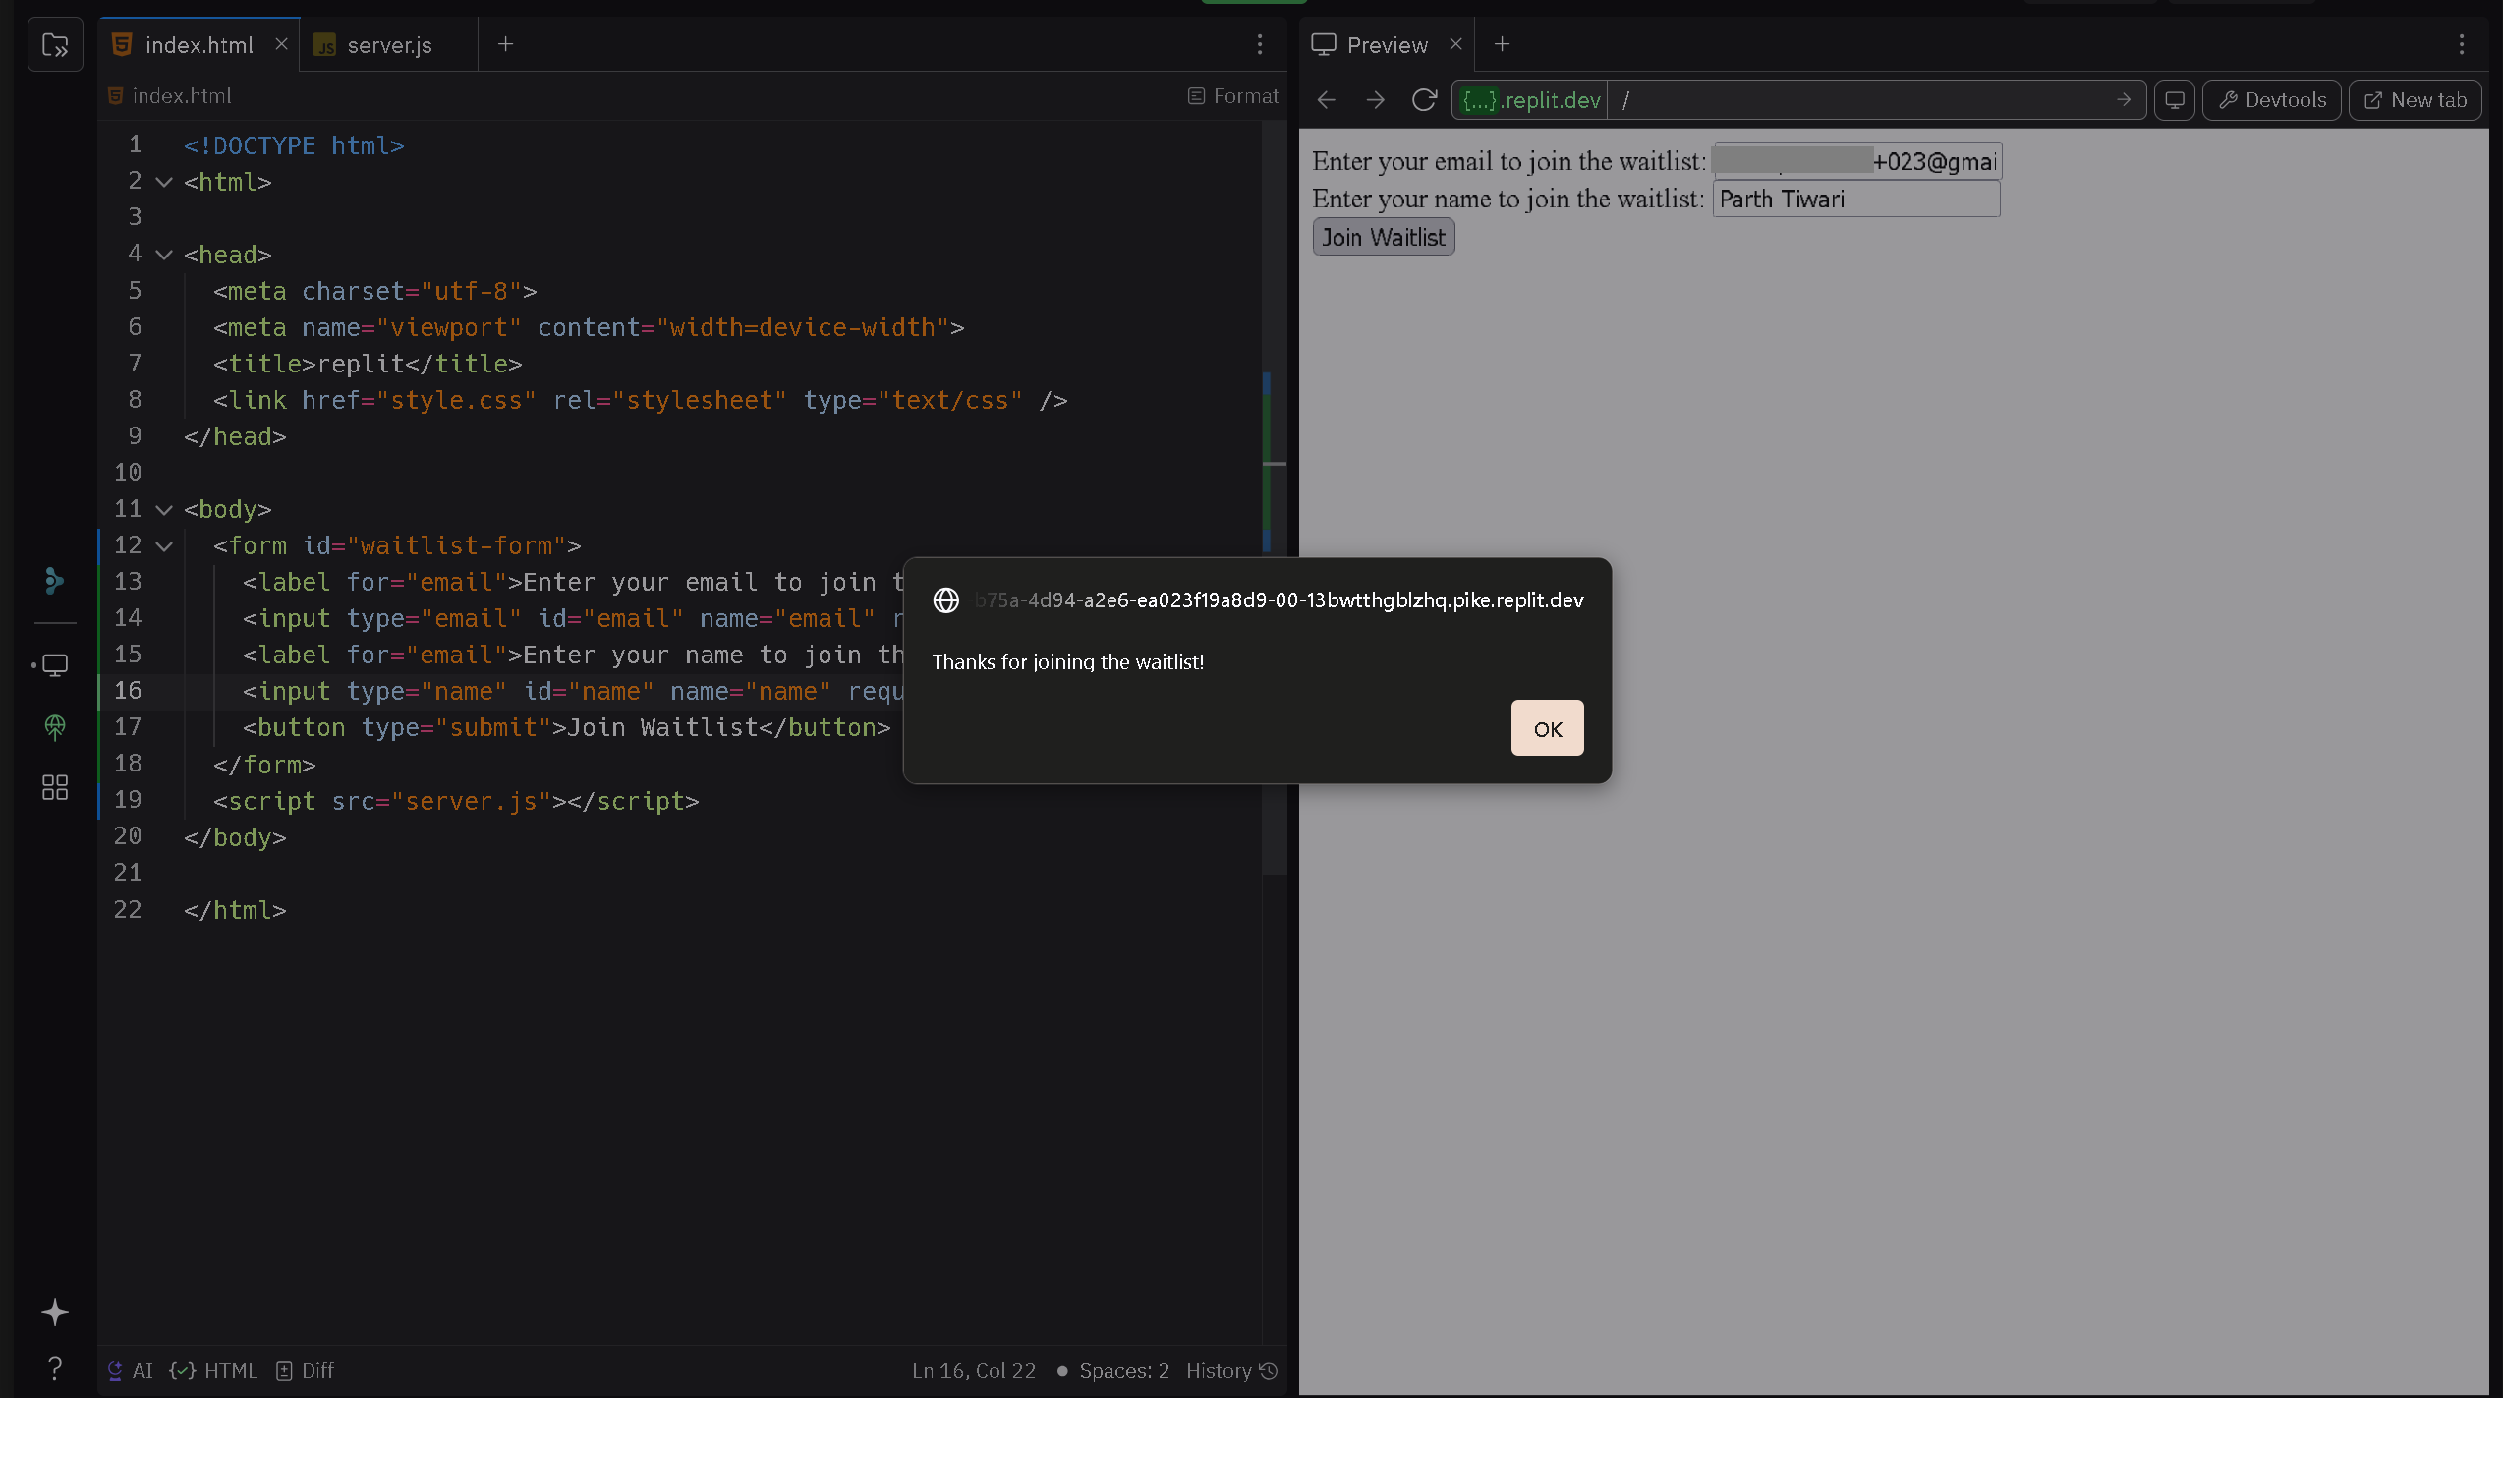
Fig: Replit editor. 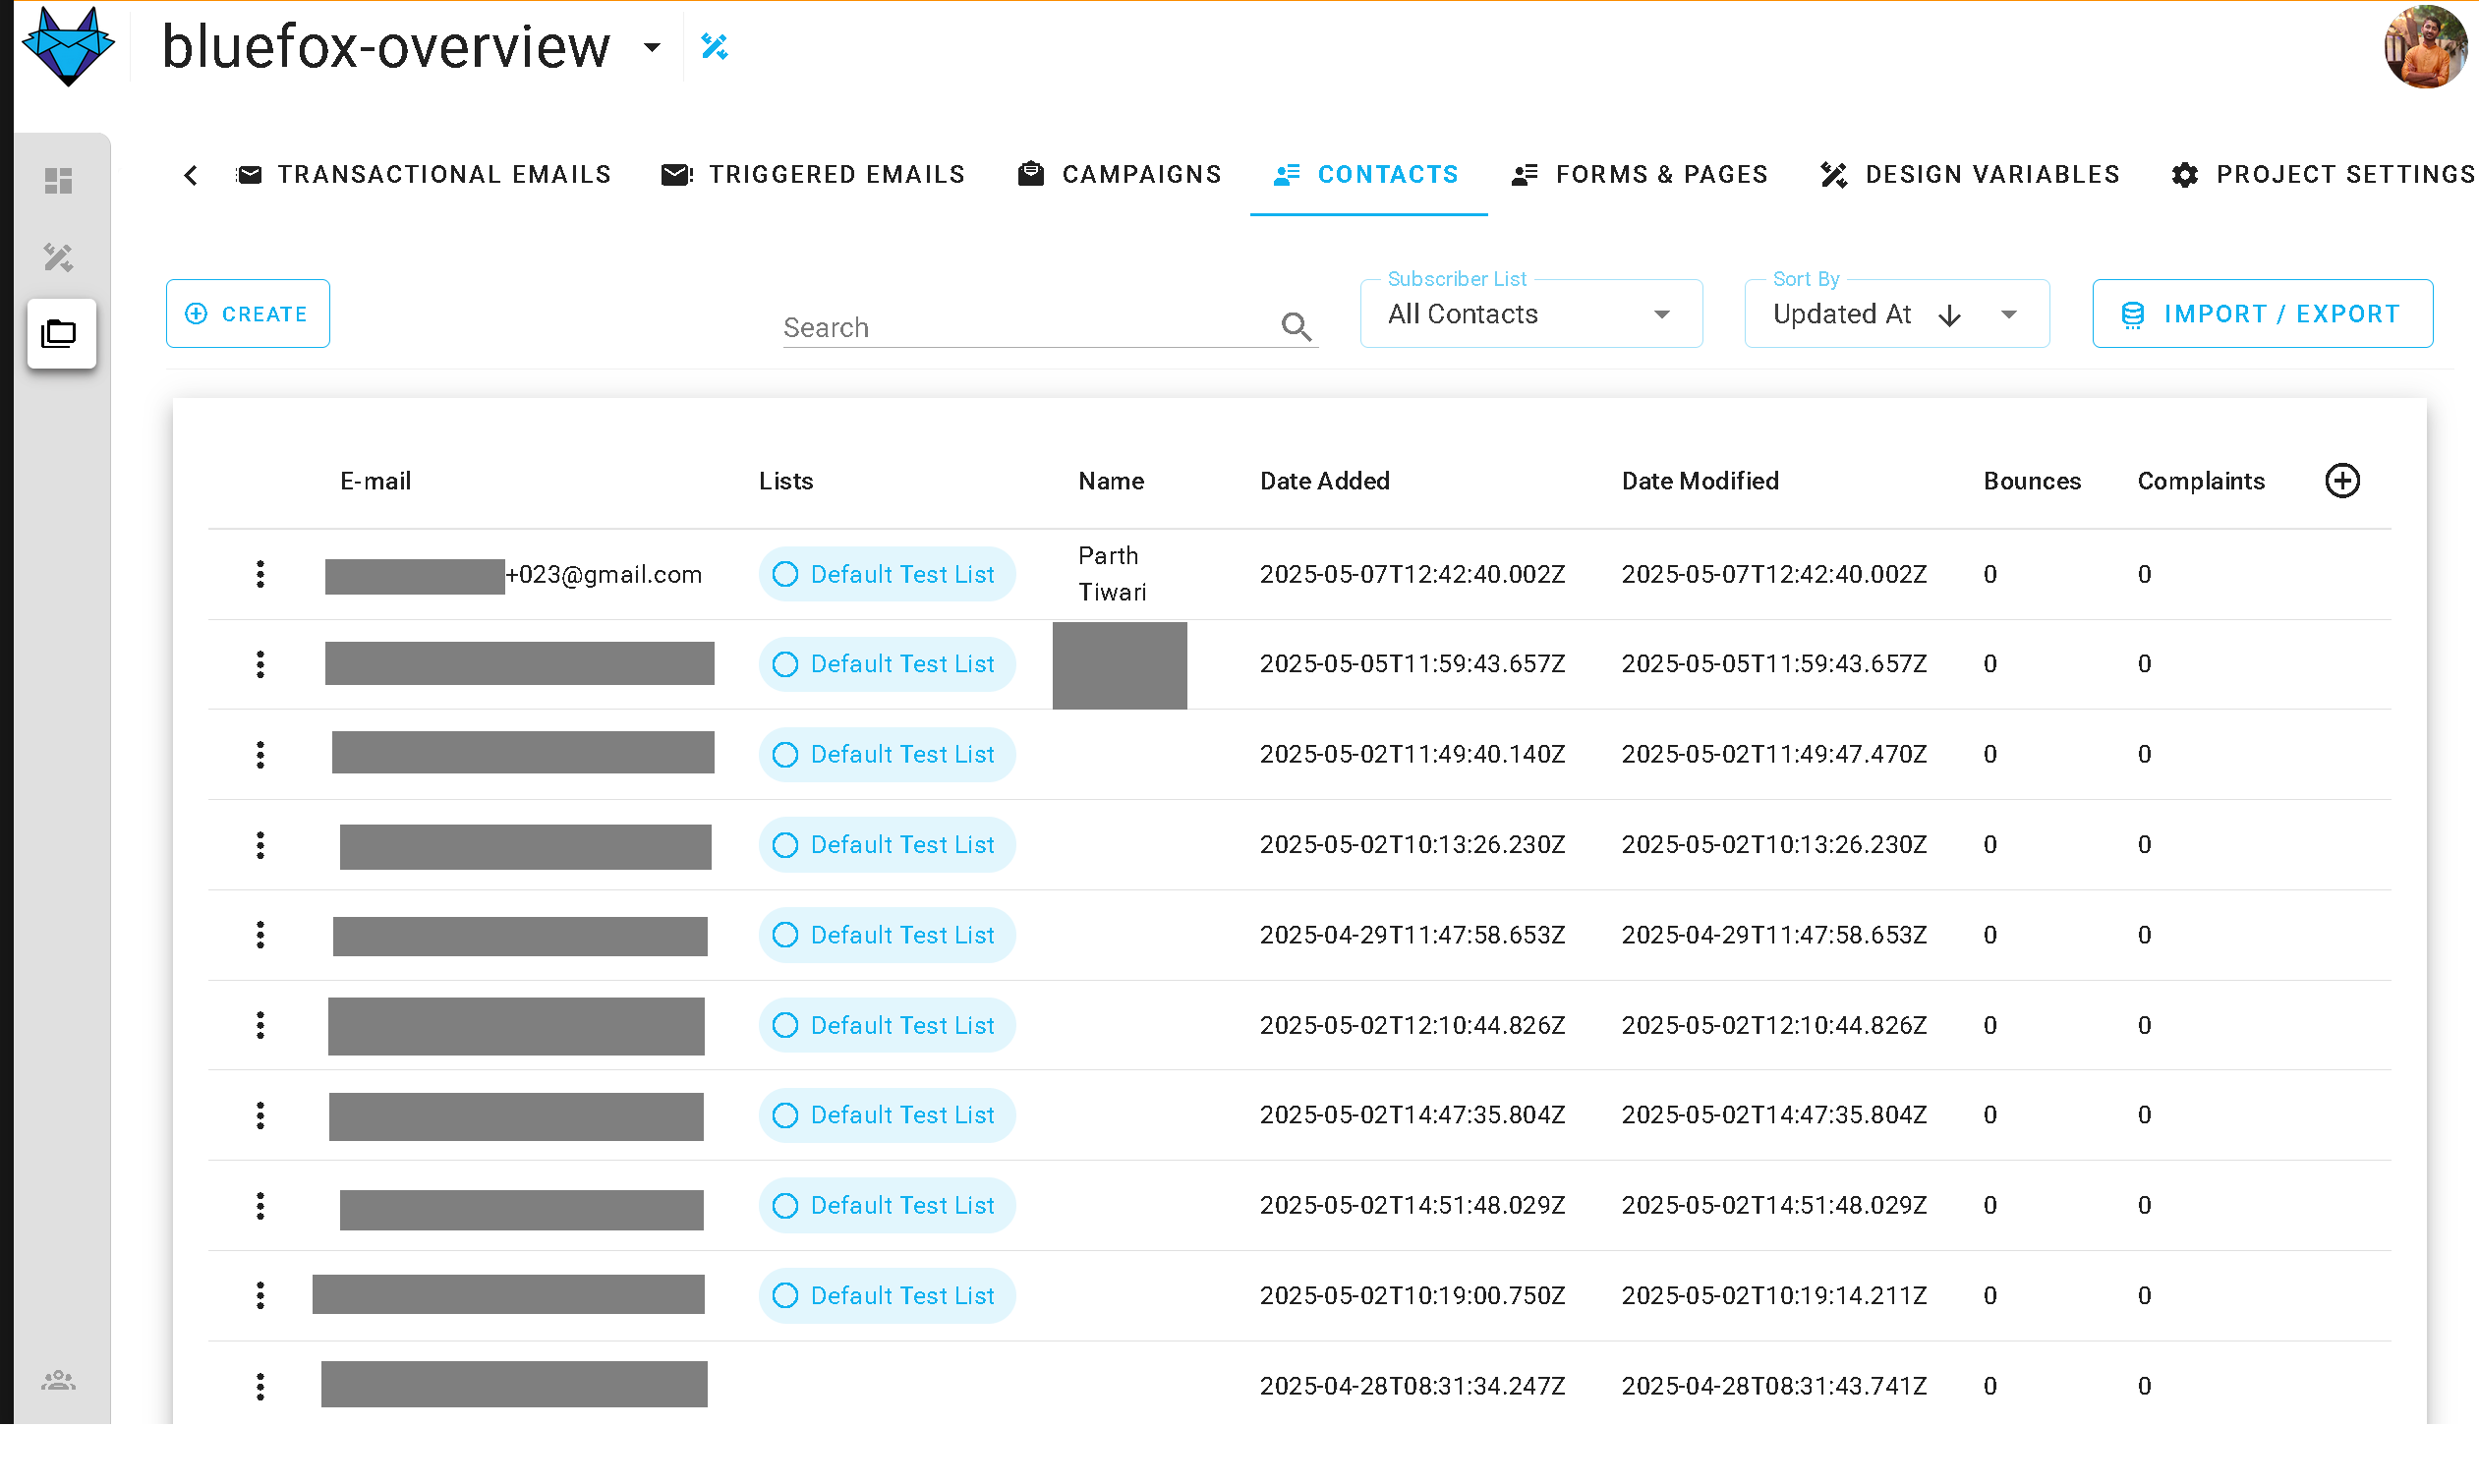
Fig: BlueFox Email's Contact Page. -
Time to deploy: As discussed we will be using github pages—follow the guide to create one. Make sure that when you push your code to github repository remove reference to API Key in header. So your code should look like this.
document.getElementById('waitlist-form').addEventListener('submit', async function(event) {
  event.preventDefault();

  const email = document.getElementById('email').value;
  const name = document.getElementById('name').value;

  const url = 'https://api.bluefox.email/v1/subscriber-lists/YOUR_BLUEFOX_EMAIL_SUBSCRIBER_LIST_ID)';

  try {
    const response = await fetch(url, {
      method: 'POST',
      headers: {
        'Content-Type': 'application/json',
      },
      body: JSON.stringify({
        name: name,
        email: email
      })
    });

    if (response.ok) {
      alert('Thanks for joining the waitlist!');
      document.getElementById('waitlist-form').reset();
    } else {
      const errorData = await response.json();
      alert(`Error: ${errorData.message || 'Something went wrong.'}`);
    }
  } catch (error) {
    alert(`Network error: ${error.message}`);
  }
});
When this is done and your page is successfully deployed grab the domain URL. For example, "tiwariparth.github.io" for me and put it in the BlueFox Email project settings.
AND Vola, Congratulations you have successfully implemented a waitlist with BlueFox Email.
What More You Can Do With BlueFox Email
Once I got the basic waitlist up and running, I started exploring what else BlueFox Email had to offer—and honestly, it goes beyond the bare minimum.
Here are a few features that stood out:
1. CAPTCHA (Anti-Bot Protection)
This is a must-have if you want to keep bots from spamming your list. BlueFox Email has built-in CAPTCHA support, so you don't need to wire up your own system or pull in extra libraries. You just enable it and it works—clean and effective.
2. Double Opt-In
A good email list isn't just about size—it's about quality. With double opt-in, every subscriber has to confirm their email before they're added. This helps improve deliverability and keeps fake or mistyped addresses off your list.
3. Custom Contact Properties
Need more than just a name and email? You can add custom fields like company name, user role, or anything else relevant to your product. This makes it easier to segment your audience later or personalize emails down the line.
4. Visual Signup Page Editor
If you don't feel like building a form from scratch, BlueFox Email also gives you a no-code signup page builder. It's simple and gets the job done—a solid fallback if you want to get something live quickly.
5. Multiple Lists
BlueFox Email lets you manage more than one list, which is super useful if you're running multiple products, stages (beta vs launch), or just want to keep test data separate. No need to hack around with tags or weird naming schemes.
6. Email Automation Builder
After setting up your waitlist, it's a good idea to reach out to those who sign up. BlueFox Email has a user-friendly automation builder that allows you to schedule actions, such as sending a welcome email or initiating follow-ups after a specific period. There's no need for custom backend coding—everything is managed through a visual editor, making it straightforward to create typical processes like onboarding sequences or reminders.
💡 Pro Tip: Combine this with a double opt-in to ensure that only confirmed subscribers enter your automation flow.
7. Email Design Editor
When you want to send personalized emails to your users, BlueFox Email comes with a handy email editor. It allows you to create layouts and style your emails through a user-friendly visual interface. You can easily customize elements like fonts, buttons, and overall layout, plus you get a live preview to see how your emails will appear on both desktop and mobile. This is a great choice for designing emails without needing to mess around with HTML or inline styles.
Bonus: If you've worked with tools like Mailchimp before, you'll find this experience quite similar!
These features weren't things I needed on day one, but knowing they were available made it easier to scale the setup when I needed to. It's one of those cases where the tool doesn't get in your way—and that's exactly what you want when you're trying to ship fast.
The Alternatives (And Why I Skipped Them)
If BlueFox Email didn't exist, here's what I would've ended up doing and why none of these felt right:
-
The "all-in-one form builders"
- Designed for marketers, not makers.
- You get drag-and-drop everything, but no version control, no API-first mindset.
- Styling is either locked down or way too bloated.
- You end up fighting the tool just to make a simple inline form behave.
-
Newsletter-first tools
- Great for publishing weekly insights, not for managing waitlists, onboarding flows, or email capture funnels.
- Most are built around content, not custom logic.
- Webhooks and integrations feel tacked on or require paid tiers.
- You're always working around their idea of "audience," not yours.
-
Duct tape with no-code automation tools
- Sure, you can connect form → webhook → Google Sheet → email tool → tag system → chaos.
- Feels great until the first failure hits and you don't know where to debug.
- Also, nothing about this is versioned. If something breaks, it breaks silently.
- You'll spend more time testing and praying than actually shipping.
-
DIY backend with Express or similar
- You now own validation, retries, SES setup, database writes, spam filtering, unsubscribe logic, email formatting, and more.
- Total control… and total maintenance.
- Not to mention the headache of keeping it secure and compliant.
- All of that for something that should've taken 5 minutes to plug in.
Conclusion: Steal My Setup
If you're a solo developer or part of a small team launching a new product, creating a waitlist can be straightforward and stress-free. No need to complicate things! Just remember, keeping your email list clean is crucial.
A well-structured waitlist does more than just gather emails it offers valuable insights, generates excitement, and helps you fine-tune your messaging before the big launch. Plus, managing sign-ups shouldn't hinder your progress you have a product to develop!
For reliable email delivery, Amazon SES is the best choice. To simplify your email and list management, BlueFox Email is a great tool. It's easy to integrate, dependable, and takes care of all the tedious email tasks, allowing you to concentrate on building your product.
To make things even smoother, I've created an open-source template that you can clone and use immediately. It's a simple, no-nonsense way to set up your waitlist without getting bogged down in repetitive work.
For solid deliverability, SES is your best friend. For managing your lists and email flows without all the hassle, BlueFox Email has you covered. For quick, no-cost deployment, you can host the whole thing on GitHub Pages. And to save you time and avoid getting stuck on repetitive setup tasks, I've put together an open-source template you can grab and go.
🔗 React Waitlist Template: https://github.com/tiwariParth/Bluefox-ReactJS-free-waitlist-template
The template comes with some great features:
- A built-in CAPTCHA for security, ensuring that you're attracting genuine users.
- Three key fields: email, name, and a reason for joining. This isn't just about collecting emails, it's about gaining insights into why users are signing up, which helps you connect with them better.
- Easy list management powered by BlueFox Email, allowing you to focus on what truly matters.
Remember, a waitlist is just one part of the bigger picture, but it's an important one. With this template, you can avoid the complexities of backend setup and jump right into growing your list and engaging your audience.
You only get one chance to make a great first impression—so make it count. With this template, you're fully equipped to do just that.